
Well I have been busy, Sugar Plum's roof tiling took me a while...much quicker in warmer weather...the glue doesn't cause the tiles to slip 'n' slide! lol
I realised at this point that I wouldn't have enough tiles to complete my roof! I bought 500 plus the fancy ones thinking it would be enough....oh no....not nearly enough would you believe it! Anyhow, I bought this batch as long ago as 2012..maybe a little later! A friend said will the new ones match, oh yes I said...famous last words! lol :oP

Horror of horrors the next batch were darker! Arrrgh!
I checked the supplier, my last batch were called terracotta, these were called red and terracotta are no longer available it seems! If I'd completed this amount on the front I would have taken those off and started again, but because the front was complete I worked around it. As luck would have it, these tiles take colour very well, so I decided to try a dark wash over them.

After the application of the first wash...the camera actually lies in this instance and doesn't show up the true colour, in real life it's a pretty good match and I'm fairly happy with it! :o)

Here the fancy tiles after I applied a coat of darker wash over them.

I had surplus of the larger tiles spare along with the the fancy ones. So I decided rather than have two blocks of slightly different coloured tiles...I would intersperse with some of the original coloured ones with the new batch. It looked far more realistic to do it this way.

Still more paint wash to do and also ageing needs to be applied.

The back almost completed... The chimney has not been sooted or aged yet .

Not finished yet!

I still need to add the ridge tiles along the top and the lead flashing around the chimney stack (which is on order).

I had to change the front tiles too....the back is better I think for the two different coloured tiles! lol

I need to add the ridge tiles. I ordered these the same time as the older tiles. I counted what I needed but when I laid them along the top and with a realistic mortar line, I either need 3/4's of a tile more or half (the photo above shows the mortar gap too wide)! So, I'm going to wait before I lay them and order 3 more (just incase of breakages) when I order my teashops roof tiles.

I had other plans for the inside of the sweet making room when I first did it. It was going to be a combination of Harry Potter and Charlie and the Chocolate Factory. I decided as it was a tiny room it was better to keep it to Harry Potter alone. The other pieces along with the sweet making machine will go into another project....with a bigger room and with another machine! ;o))
So I started to take some things out. The overhead chain is now gone as are all the bright items.
The photo's of the room are shown without the flash, with the flash the room shows a garish colour and not how it is in real life (like it's shown below), the downside of not using a flash..is grainy photo's...so apologies for that! ;o)

New vintage pots for the room and a little oversized...perfect for a sweet making room!
Still playing...not happy with all the pipework and their placement.
De cluttered and I have been playing with its layout. The actual room isn't finished yet...the skirting board isn't glued in and the walls need a little work...not to mention the lights need fitting! lol

I was thinking of an l-shaped table...but that will leave me little room for scope....so....

One long table will be better....no not this one, it's far too short and doesn't offer any underneath storage! lol

I've been on the look out for some vintage pots...all kinds...this was one of my first pieces....I love the pot! I plan to place it on a small stool.

In the meantime I wanted to add more items to the sweet making machine! Here they are...the flash is on...so the room looks garish, but not true to life! I placed the lid of the copper pot on top of the machine and it looks rather better there. ;o)

I bought odd bits of copper, brass etc of piping a while back and also mini springs...so lots of playing with to embellish parts of the machinery.

I want to join all the parts together so it is one big sweet making machine. ;o)) I will in due course fill the copper pot with some concoction! lol

The plan is to have the pipes extend into the loft where supplies for the shop are stored. I plan to have filled sacks, pots etc

Not sure I will use all these pots, they all have lids though. I may either make them look like aged wood or ceramic.

The pipework isn't complete nor soldered or glued in, I'm just trying looks for now...it's bound to change!
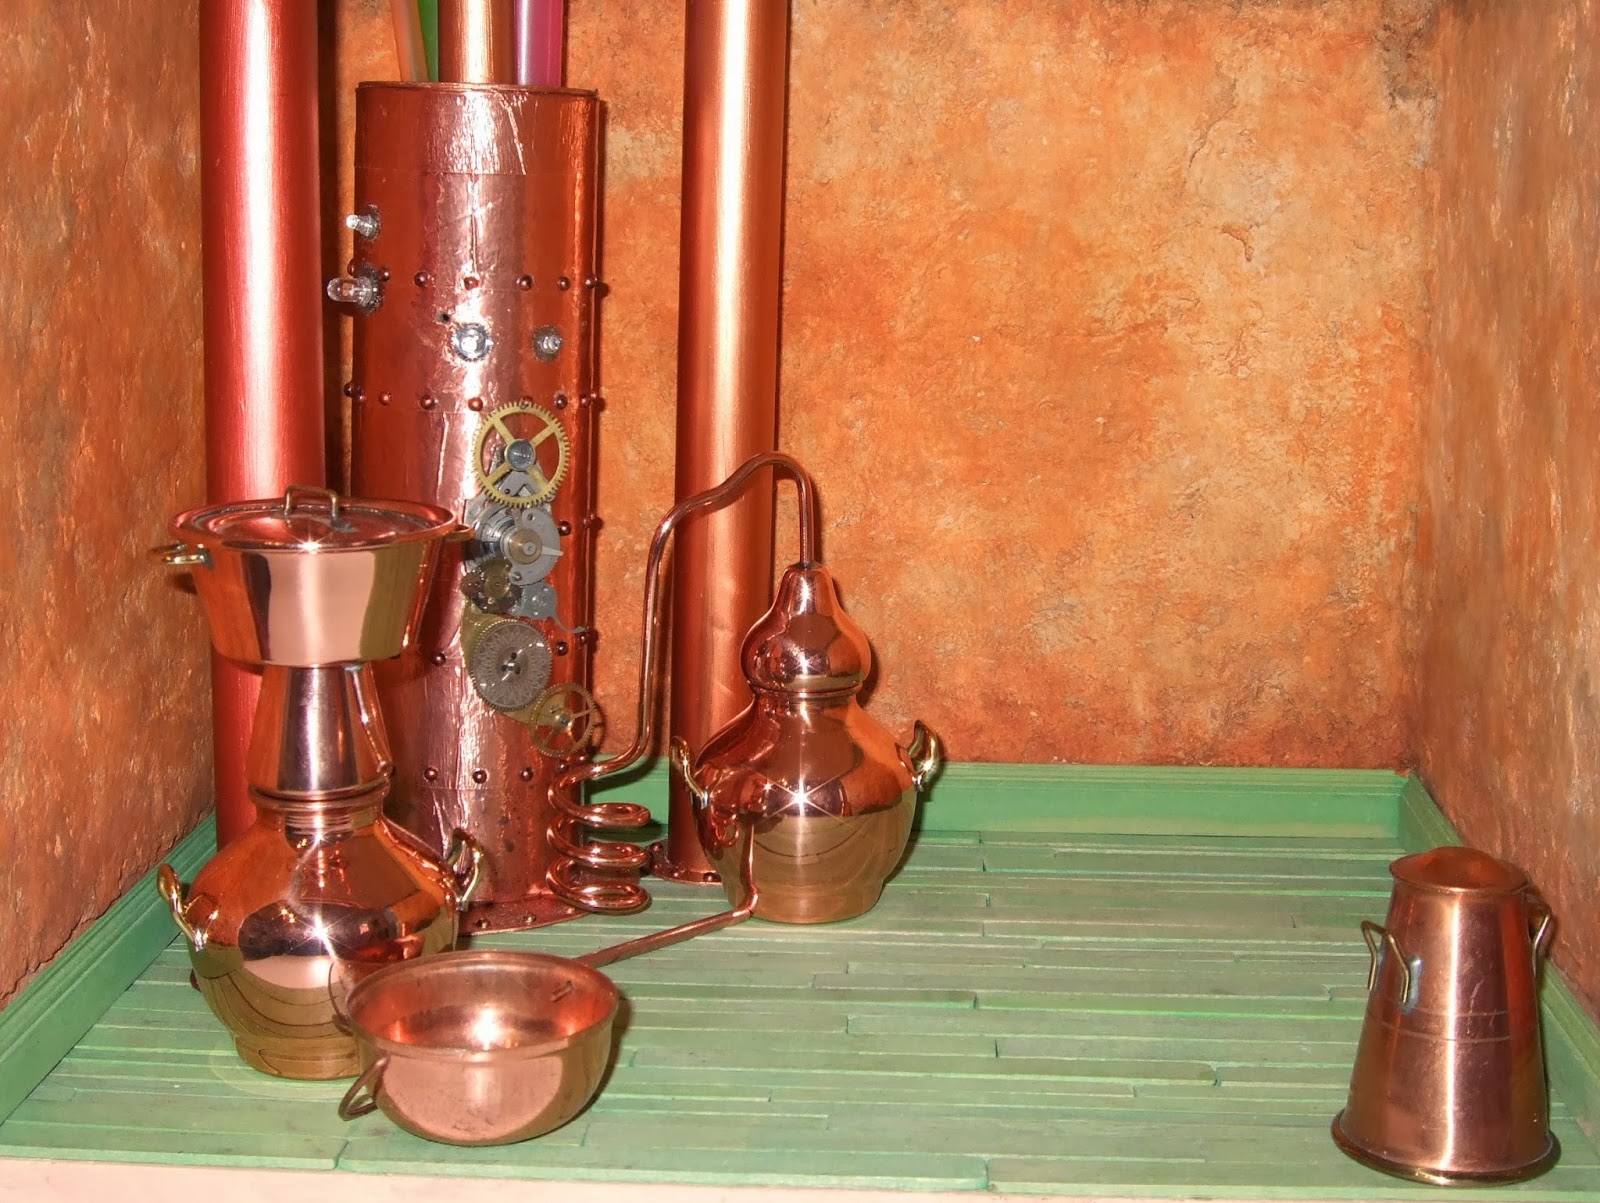
I bought two vintage copper churns for milk and cream (I will fill them), the little lids come off too.

It won't come together quickly, but it will get there! I've changed the front colour of the roof a little more too, again more work needs to be done.

So whilst I await for supplies to arrive I'm starting work on Mrs Puddifoot's Tea Shop! I already have some of the supplies...enough to keep me going for a while.

I bought this old vintage Sid Cooke corner kit a couple of years ago, it was already put together but barewood. I primed it and started to add the stone application to some of the pieces, all before I had a heat gun. Some of the pieces were glued on incorrectly and also made it difficult to decorate, so I've now used a heat gun to remove these pieces. :o))

The door panel is the worst piece of all, you cannot decorate with this piece in situ. Not sure what glue was used but it was pretty resistant and required a lot of prolonged heat before it would budge! The panel was pinned both from the underneath and on top! I wasn't sure what to do...I was going to loosen the base and try and ease one side of the panel out, and then my brain kicked in and I had just enough space to get my razor saw in and saw the pins off! YAY!!! :o))

The door panel will have to pinned on one side and glued back in once the room and panel are decorated, it's the design of the panel that's the issue! The newer corner kits have a routed out groove that the panel sides in on...this doesn't! :o/

Once all the pieces I removed were off, I started to sand the pieces smooth. One of the windows fell apart due from the heat of the gun! The primer saved the actual wood from scorching...so an asset there!

The door panel is out...and the room is clear and ready for decoration.

I know how I want to do this shop....so ready for the next stage! Not until Friday when I am not working.

I hope you don’t mind my ramblings and madness! :o))
Michelle xxxx
Beautiful job, I love the roof, is very well done!
ReplyDeleteThank you! My lead flashing has arrived..so a few little jobs I can do. :o))
DeleteI like it, I can see where you would need another type of table but for the most part I like how it's coming along.
ReplyDeleteHugs
Marisa
I only have a rough idea how it will be laid out...until I have lots more pieces hard to see what will work. However, I need a 7 inch long table to look like a work room. :o)))
DeleteI will come back to work on the sweet shop soon!
Hugs!